Enabling WLAN would offer us dozens of possibilities to extend the functionality of the HomBot and to make it easier to tweak configuration, so let's get this done!
Searching for a way to enable WLAN on the LG HomBot lead me to roboter-forum.com. Since, the described method is to update the HomBot with a cracked firmware image (compiled by someone on the Internet), this way was not satisfying at all.
The following has been tested with HomBot VR64703 and firmware version 13865 and 16552 (get the current firmware at).
Buy a compatible wlan dongle (e.g. Edimax EW-7811UN 150Mbps Wireless Nano USB Adapter) plug it in the USB connector on the bot and
configure your wlan router as access point using the SSID RK_HIT and no encryption. (Use this method only as a starting point, unencrypted
networks bare a tremendous security risk)
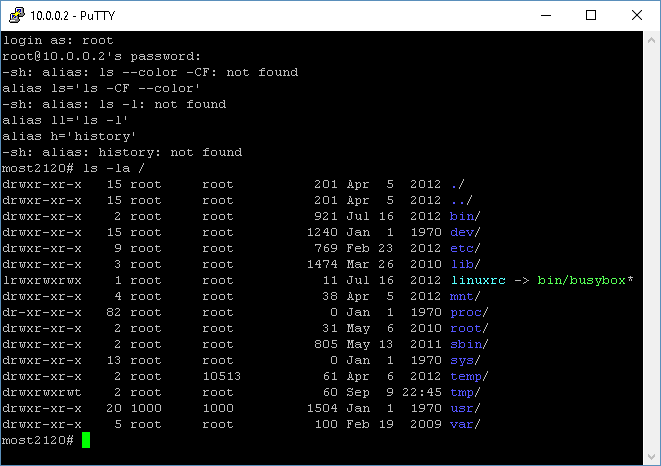
Afterwards restart the HomBot and check for devices connected to your router. Download putty.exe and connect to the IP of your HomBot using
the username root and password most9981.
This part is thought to be a complement of TL;DR where I elaborate the achieved knowledge in more detail.
The official firmware update in version 13865 as well as in version 16552 both include three files to be copied on an empty FAT32 formatted
USB Stick. After plugging the USB Stick to the HomBot and starting up a firmware update is performed as the voice sequence says.
Taking a closer look at the files contained in the update we can find a script update.sh executing update.axf update.dat. Since .axf is the object file format containing both the object code as well as the debug information this is a good starting point!
Running strings with update.axf further approves this:
~\Update_13865>strings update.axf

...
GetFlagInfoFromVisionboard
ShakeStreamData
UnpackagingFileAfterMainHeaderRead
DoFirmwareUpdate
main
$d.realdata
...
Let's have a closer look at DoFirmwareUpdate...
After disassembling the update.axf with ida and generating the pseudocode (showing the decompiled C code)
like the one below, we can reconstruct what happens during an update.
1
2
3
4
5
6
7
8
9
10
11
12
13
14
15
16
17
18
19
20
21
22
23
24
25
26
      if ( stReadSubHeader.unDataSize == -1 )
      {
        if ( !(stReadSubHeader.unFlag & v2) && stReadSubHeader.unFlag )
        {
          printf("=> Skip %s\n", pName);
        }
        else
        {
          printf("=> Make directory %s\n");
          if ( mkdir((const char *)pName, 0x1FDu) && *_errno_location() != 17 )
          {
            printf("UnpackagingFile - can't make directory (%s)\n", pName);
            return -2;
          }
        }
      }
      else if ( stReadSubHeader.unFlag & v2 || !stReadSubHeader.unFlag )
      {
        printf("=> Make file %s\n", pName);
        unlink((const char *)pName);
        nWriteFile = open((const char *)pName, 577);
        if ( nWriteFile == -1 )
        {
          printf("UnpackagingFile - File open error (%s)\n", pName);
          return -3;
        }
By this, it was not hard to write a tool extracting the .dat file contained in the firmware update.
The source code of the DatExtractor can be found on github and the latest
release including the x86 and x64 binaries for windows can be found here.
Note: DatExtractor is currently only available for Windows. Feel free to contribute, making DatExtractor usable for a broader audience!
To extract the files contained in the firmware image into a new folder 'extracted_update_13865' use
Update_13865>DatExtractor_v0.1_x86.exe update.dat extracted_update_13865After the firmware image has been extracted we can observe the following in ~\extracted_update_13865\usr\etc\rc.local:
1
2
3
4
5
6
7
8
9
10
11
12
13
14
15
16
17
18
19
20
21
22
23
24
25
26
27
28
29
30
31
32
33
34
	#!/bin/sh
	...

	WIFI_ESSID="RK_HIT"
	WIFI_IP=""
	WPS_MODE="WPS_OFF"
	OLD_ESSID=$WIFI_ESSID
	SOFTAP_MODE=`cat /usr/rcfg/Function.xml | grep 'SoftAP_Eable' | busybox awk '{print $3}' | busybox cut -d\" -f 2`

	...

	if [ -f /usr/etc/wifi.cfg ]
	then
		WIFI_ESSID=`cat /usr/rcfg/wifi.cfg | grep 'ESSID' | busybox awk '{print $2}'`
		WIFI_IP=`cat /usr/rcfg/wifi.cfg | grep 'IP' | busybox awk '{print $2}'`
		WPS_MODE=`cat /usr/rcfg/wifi.cfg | grep 'WPS' | busybox awk '{print $2}'`
		echo "Found wifi.cfg Try connection using preset.."
	fi

	...

	echo "Connect to" $WPS_MODE $WIFI_ESSID $WIFI_IP

	wificonn.sh "$WPS_MODE" "$WIFI_ESSID" "$WIFI_IP" "$SOFTAP_MODE"
	WIFIDONGLE_ATTACHED=$?

	if [ "$WIFIDONGLE_ATTACHED" -eq 0 ]
	then
		#WIFI DongleÀÌ ÀÖ´Â °æ¿ì dropbear ½ÇÇà
		echo "run dropbear"
		dropbear
	fi

	...
By default a wlan connection with a SSID RK_HIT is established if no wifi.cfg is provided. The setup for the wlan is made by the script wificonn.sh and triggers
the execution of the SSH Server dropbear on success.
The script wificonn.sh supports the following wlan chipsets:
Since this wlan dongle is based on the 8192cu chipset, I ordered it for my HomBot. The basic setup of an open wlan can be found in TL;DR above. A more appropriate connection with respect to security should be considered and can be configured either via SSH or via an update script.
Other hacks I found in rc.local were the retreival of map information by connecting an usb stick with an empty folder blackbox and
the execution of scripts by connecting an usb stick with an script update.sh containing the line #IS_HIT_UPDATE_SCRIPT=1.
Scripts I used during this project can be found in my github repository.