Serial port often available on embedded devices like routers, embedded devices, IoT devices (e.g. smart bulbs), or microcontroller based projects (e.g. with arduino, esp8066, esp32 boards) Thus, a serial port connection can give us additional insights when we want to debug or analyze the inner workings of such devices.
This can be the case if we have to debug the boot or shutdown process of our device or if we want to reverse engineer a device to gain better insights in the inner workings of it.
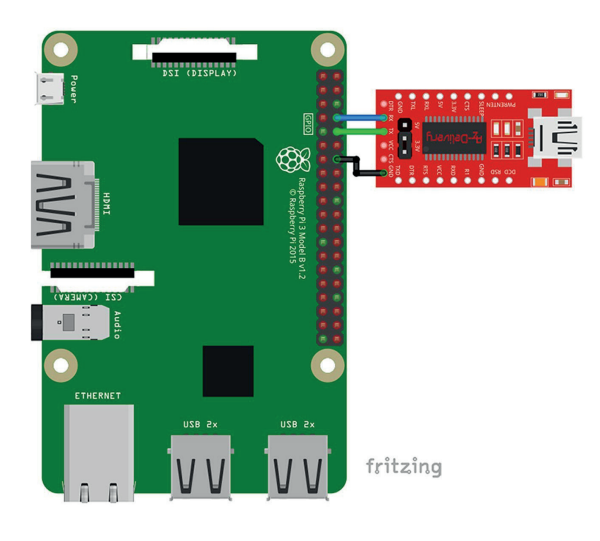
Since it is always better to try things in a known environment I chose my Raspberry PI4 which I have root access to. Since I don’t have a serial port available on my laptop I use a FTDI (FT232RL) USB-to-TTL converter to bridge the TTL level signal of the Raspberry PI’s UART to my laptop’s USB port.
The Raspberry PI4 supports a power supply via USB, 3.3V via GPIO header pin 1 (or alternatively pin 17) or 5V via GPIO header pin2 (or alternatively pin4).
Besides the possible power supply of up to 5V the SoC of the Raspberry PI works on 3.3V. Thus, the voltage levels of the UART are also 0V and 3.3V.
To not damage our device we have to make sure the FT232RLs jumper is set to 3.3V.
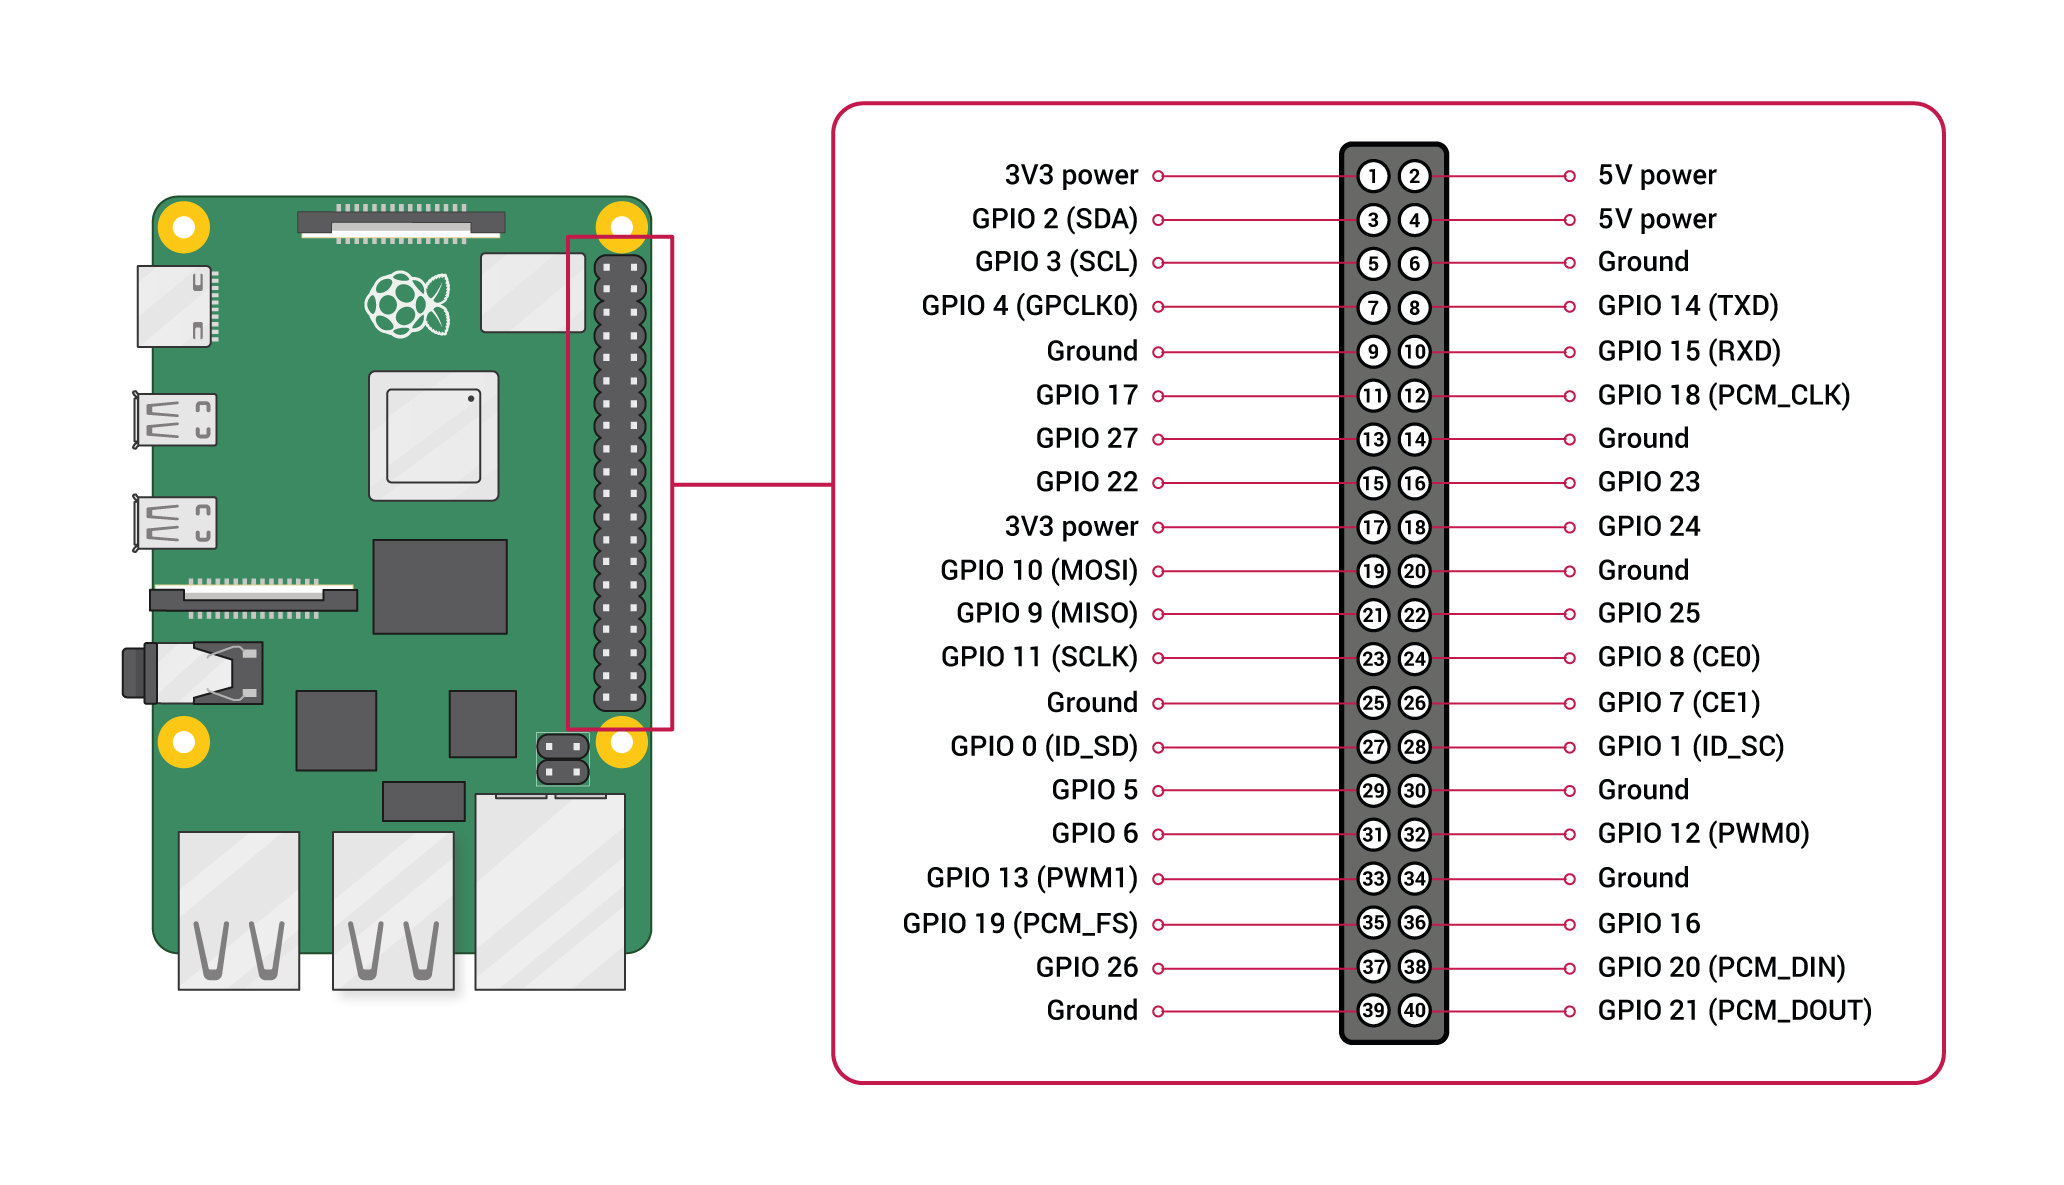
In the following diagram the GPIO header of the Raspberry PI4 is shown.
We can see that the transmit port of the UART0 is connected to the GPIO header pin 14 and the receive port is connected to pin 15, respectively.
To connect the Raspberry PI4 correctly with the FT232RL cross out the receive and transmit pins of each device as shown in the fritzing diagram above.
Now that we have setup the wiring (hopefully) correctly, we can dive into the configuration to establish a serial connection between the Raspberry PI4 and the host system (e.g. a laptop)…
Note: Most of the commands invoked in the remainder only work with elevated privileges. So either prepend
sudoor switch to a shell as root.
On vanilla Raspberry PI4 installations with Ubuntu image for Raspberry PI4 the following steps are optional, since these settings are there by default.
To enable UART (default) add enable_uart=1 to config group all in your boot/firmware/config.txt:
$ cat /boot/firmware/config.txt
[all]
kernel=vmlinuz
cmdline=cmdline.txt
initramfs initrd.img followkernel

...

# Enable the serial pins
enable_uart=1
...
The kernel command line used by Raspberry PI 4’s bootloader can also be specified in this file (See line 3) and is taken from
boot/firmware/cmdline.txt by default.
$ cat /boot/firmware/cmdline.txt
console=serial0,115200 dwc_otg.lpm_enable=0 console=tty1 root=LABEL=writable rootfstype=ext4 rootwait fixrtc quiet splash
In my case the serial0 which is mapped to /dev/tty0 is used with a baud rate of 115200.
After plugging in the FT232RL (USB to TTL Converter) you can figure out which device got created from the kernel ring buffer.
$ dmesg

[  208.741046] usb 2-2.2: new full-speed USB device number 6 using uhci_hcd
[  209.066688] usb 2-2.2: New USB device found, idVendor=0403, idProduct=6001, bcdDevice= 6.00
[  209.066695] usb 2-2.2: New USB device strings: Mfr=1, Product=2, SerialNumber=3
[  209.066696] usb 2-2.2: Product: FT232R USB UART
[  209.066697] usb 2-2.2: Manufacturer: FTDI
[  209.066698] usb 2-2.2: SerialNumber: A50285BI
[  209.072963] ftdi_sio 2-2.2:1.0: FTDI USB Serial Device converter detected
[  209.072990] usb 2-2.2: Detected FT232RL
[  209.075005] usb 2-2.2: FTDI USB Serial Device converter now attached to ttyUSB0
Dependent on the configuration of the Kernel command line arguments used for the Raspberry PI
the settings of the serial used may vary.
You can get the baud rate used from boot/firmware/cmdline.txt.
Also make sure the UART is enabled in boot/firmware/config.txt.
Note: You can always check settings of a tty device using
stty -F /dev/tty<YOUR-DEVICE>(e.g.stty -F /dev/ttyUSB0) and adujust settings bystty -F /dev/ttyUSB0 115200 cs8
minicom -D /dev/ttyUSB0 -b 115200 --8bit
Press Ctrl+A O to enter setup menu and select Serial port setup.
Make sure the settings match the target configuration.
Since I don’t use any flow control, I disabled both Hardware Flow Control and Software Flow Control
  | A - Serieller Anschluss      : /dev/ttyUSB0     |
  | B - Pfad zur Lockdatei       : /var/lock        |
  | C - Programm zur Rufannahme  :                  |
  | D - Programm zum Wählen      :                  |
  | E - Bps/Par/Bits             : 115200 8N1       |
  | F - Hardware Flow Control    : Nein             |
  | G - Software Flow Control    : Nein             |
On reboot of the Raspberry PI we see all the boot messages transferred via serial finally resulting in a login prompt:
[  OK  ] Reached target Cloud-config availability.
[  OK  ] Reached target System Initialization.
[  OK  ] Started Daily apt download activities.
[  OK  ] Started Daily apt upgrade and clean activities.
[  OK  ] Started Daily dpkg database backup timer.
[  OK  ] Started Periodic ext4 Online��…ata Check for All Filesystems.
[  OK  ] Started Discard unused blocks once a week.
[  OK  ] Started Daily rotation of log files.
[  OK  ] Started Daily man-db regeneration.
[  OK  ] Started Message of the Day.
[  OK  ] Started Daily Cleanup of Temporary Directories.
[  OK  ] Reached target Path Units.
[  OK  ] Listening on Avahi mDNS/DNS-SD Stack Activation Socket.
[  OK  ] Listening on cloud-init hotplug hook socket.
[  OK  ] Listening on D-Bus System Message Bus Socket.
         Starting Docker Socket for the API...
[  OK  ] Listening on Open-iSCSI iscsid Socket.
[  OK  ] Listening on Socket unix for snap application lxd.daemon.
[  OK  ] Listening on Socket unix f��…p application lxd.user-daemon.
         Starting Socket activation for snappy daemon...
[  OK  ] Listening on UUID daemon activation socket.
[  OK  ] Listening on Docker Socket for the API.
[  OK  ] Listening on Socket activation for snappy daemon.
[  OK  ] Reached target Socket Units.
[  OK  ] Reached target Basic System.
...
systemd-user-sessions.service
         Starting Hold until boot process finishes up...
         Starting Terminate Plymouth Boot Screen...
[  OK  ] Finished Remove Stale Onli��…ext4 Metadata Check Snapshots.

Ubuntu 22.04.3 LTS idefix ttyS0

idefix login:
Now we can login to the system using your username and password.
Finally, the terminal session can be quit by pressing Ctrl+A Z follwed by X.
To test the connection without rebooting the kernel or waiting for some kernel output we can
invoke cat < /dev/serial0 to receive data sent from minicom or echo "test" > /dev/serial0 to send data to minicom, respectively.
Note: Make sure to execute these commands in a shell as root (e.g.
sudo bash) and to have disabled hardware flow control.
Note: Also make sure that you setup the baud rate, nr of bits used stopbit settings, parity and probably other serial communications settings before testing.